Elevate Your Health and Wellness
As a beekeeper, you have access to a unique and valuable resource – propolis! Here are some products and bee propolis recipes you can easily make, along with a step-by-step guide on how to harvest.
Pr
Honey bees create a remarkable substance called propolis, also known as “bee glue,” that plays a vital role in keeping their hives healthy. But propolis benefits extend far beyond the beehive, offering a range of potential health applications for humans.
What is Propolis?
Propolis is a resinous material that honey bees collect from the buds and bark of trees. They mix this resin with beeswax and enzymes to create a sticky substance that serves several purposes in the hive:
- Defense System: Propolis acts as a natural disinfectant, sealing cracks and holes in the hive to prevent the entry of bacteria, viruses, and fungi.
- Hive Structure: Bees use propolis to reinforce the honeycomb and create a smooth, sterile environment for raising their young.
- Temperature Regulation: Propolis helps bees maintain a constant temperature within the hive, crucial for brood development and honey production.

The Potential Health Benefits of Propolis
For centuries, various cultures have used propolis for its medicinal properties. Modern research is now exploring the potential of propolis to support human health in a number of ways:
- Antibacterial and Antifungal Activity: Studies suggest that propolis may be effective against various bacteria and fungi, potentially aiding wound healing and fighting infections.
- Immune System Support: Propolis is rich in antioxidants and flavonoids, which may help boost the immune system and fight free radicals in the body.
- Anti-inflammatory Effects: Propolis may have anti-inflammatory properties, potentially aiding conditions like sore throat, mouth ulcers, and even arthritis.

It’s important to consult with your doctor before using propolis, especially if you have allergies, are pregnant, or breastfeeding.
Honey bee propolis is a fascinating natural product with a long history of traditional use. While more research is needed to fully understand its potential health benefits, propolis offers a promising option for you if you seek natural ways to support your well-being.
Step-by-Step Guide to Harvesting Propolis:
Step 1: Position Your Traps
Propolis traps are specially designed traps that make it easier to collect propolis. I prefer to replace my inner covers with propolis traps. You can also position propolis traps in areas of the hive where bees frequently deposit propolis. Common locations include entrances and the edges of frames.

Step 2: Monitor and Rotate Traps
Regularly check the traps for propolis buildup. Once a trap is adequately covered, carefully remove it, ensuring minimal disruption to the hive.
Step 3: Remove Excess Bees
Using a bee brush, gently remove any bees clinging to the propolis. Ensure the propolis remains intact and free of bee parts.
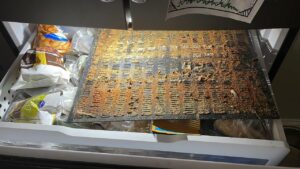
Step 4: Freeze Traps
Place the collected propolis traps in the freezer for a few hours. This will make it easier to remove the propolis, but your family members might get disgusted.

Step 5: Remove Impurities
Equipment:
- Pail or large bowl
- Strainer
- Fine mesh cloth (optional)
- Spoon

- Coarse Separation: Crush or break the propolis into smaller pieces. Place it in a pail or bowl.
- Water Bath: Fill the container with cool water. The propolis will sink, while most impurities like wood and bee parts will float.
- Skimming: Use a spoon to skim off any floating debris.
- Straining: Strain the propolis solution through a colander to remove any remaining larger particles.
- Fine Mesh (Optional): For a finer separation, pour the propolis solution through a fine mesh cloth to capture any remaining tiny debris.
- Drying: Spread the cleaned propolis on a clean, dry surface and allow it to dry completely in a cool, well-ventilated area out of direct sunlight.
Step 6: Store Properly
Store your harvested propolis in a clean, airtight container in a cool, dark place. Properly stored propolis can last for an extended period without losing its potency.
Embrace the art of propolis harvesting and unlock a world of possibilities for your health and wellness endeavors. Remember, patience and care are key in this process. Happy harvesting!

Propolis Tincture Recipe
Making a propolis tincture is a straightforward process. Here’s a step-by-step guide:
Ingredients and Materials Needed:
– Raw bee propolis (collected from your hive)
– High-proof alcohol (such as vodka or Everclear)
– A glass jar with a tight-fitting lid
– A fine-mesh strainer or cheesecloth
– Dark glass dropper bottles for storing the tincture
– Labels and a marker to indicate the contents and date

Steps:
1. Break the Propolis into Small Pieces
– Use a hammer or mallet to break the propolis into small, manageable pieces. This will help increase the surface area for extraction.
2. Fill the Jar with Propolis:
-Place the broken propolis into a glass jar, filling it about halfway. The jar should be large enough to accommodate both the propolis and the alcohol.
3. Add Alcohol:
– Pour the high-proof alcohol over the propolis until it completely covers the resin. Use a high-proof alcohol to ensure effective extraction.
4. Seal the Jar and Shake:
– Seal the jar tightly with a lid and give it a good shake to ensure that the propolis is well mixed with the alcohol.
5. Allow the Mixture to Infuse:
– Store the sealed jar in a cool, dark place, like a pantry or cupboard. Let it sit for about 2 to 4 weeks. Shake the jar gently every day or so to facilitate the extraction process.
6. Strain the Mixture:
– After the infusion period, use a fine-mesh strainer or cheesecloth to separate the liquid from the solid propolis. Squeeze out as much of the tincture as possible.
7. Store the Tincture:
– Pour the strained liquid into dark glass dropper bottles. These bottles help protect the tincture from light, which can degrade its potency.

8. Label and Date the Bottles:
– Clearly label the bottles with the contents (“Propolis Tincture”) and the date of preparation. This helps you keep track of freshness.
Usage:
– To use the propolis tincture, simply place a few drops (usually 5-10) under your tongue or mix it with a beverage. It can also be applied topically for skin conditions or wounds.
**Note:**
– Keep the tincture in a cool, dark place to maintain its potency. If stored properly, it can last for several years.
By following these steps, you’ll be able to create a potent propolis tincture that can be used for various health and wellness purposes.

Propolis Salve or Ointment Recipe
Ingredients:
– 1/4 cup of propolis tincture
– 1/2 cup of carrier oil (such as olive oil, coconut oil, or sweet almond oil)
– 1/4 cup of beeswax pellets or grated beeswax
– Optional: a few drops of essential oil for fragrance (e.g., lavender, tea tree, or chamomile)

Equipment:
– Double boiler or a heatproof glass bowl over a pot of simmering water. Make sure you’ll never want to use it for food preparation again because it’ll never come clean.
– Stirring utensil (e.g., a wooden stick or spoon)
– Glass jars or tin containers for storing the salve

Steps:
1. Prepare Your Work Area:
– Clean and sanitize all utensils and containers you’ll be using.
2.Infuse the Carrier Oil:
– Combine the carrier oil with the propolis tincture in a double boiler or heatproof glass bowl. Gently warm the mixture over low heat for 2-3 hours. This process will infuse the oil with the beneficial properties of propolis.
3. Strain the Mixture:
– After the infusion period, strain the mixture through a fine mesh strainer or cheesecloth to remove any solid particles. This will leave you with a propolis-infused oil.
4. Melt Beeswax:
– Using the double boiler or the same heatproof bowl, melt the beeswax over low heat. Beeswax helps thicken and solidify the salve.

5. Combine Beeswax and Propolis-Infused Oil:**
– Once the beeswax is completely melted, slowly pour in the propolis-infused oil while stirring continuously. Mix thoroughly to ensure even distribution.
6. Optional: Add Essential Oils (for fragrance):
– If desired, add a few drops of essential oil for fragrance and additional therapeutic benefits. Stir well to incorporate.
7. Pour into Containers:
– Carefully pour the mixture into clean, sterilized glass jars or tin containers. Allow it to cool and solidify.

8. Label and Store:
– Label the containers with the date and contents. Store the salve in a cool, dry place, away from direct sunlight.
Your propolis salve or ointment is now ready for use! Apply it to minor cuts, scrapes, burns, insect bites, or irritated skin for its natural healing and antiseptic properties. Remember to perform a patch test before applying it to a larger area to ensure there are no allergic reactions.
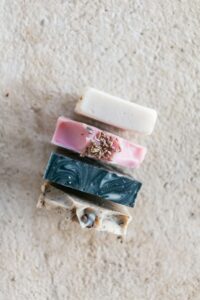
Propolis Soap Recipe
Making propolis soap is a wonderful way to harness the natural antibacterial and skin-nourishing properties of this bee-produced substance. Here’s a basic recipe and step-by-step guide to help you create your own propolis soap:

Ingredients:
1 pound of melt-and-pour soap base (unscented and natural)
1 tablespoon of propolis tincture (ensure it’s food-grade and suitable for skincare)
Optional: Essential oils for fragrance (lavender, tea tree, and chamomile are popular choices)
Optional: Natural coloring agents (such as turmeric powder or spirulina)
Soap molds
Equipment:
Microwave-safe bowl or double boiler
Stirring utensil (spoon or spatula)
Soap cutter or knife
Measuring spoons

Steps:
1. Prepare Your Work Area:
– Ensure your workspace is clean and organized. Lay out all your ingredients and equipment for easy access.
2. Cut and Melt the Soap Base:
– Cut the soap base into small, even pieces. This will help it melt evenly. Place the pieces into a microwave-safe bowl or a double boiler.
– If using a microwave, heat the soap base in short intervals (about 30 seconds each) until completely melted. If using a double boiler, heat over low to medium heat until melted.
3. Add Propolis Tincture:
– Once the soap base is melted, add 1 tablespoon of propolis tincture. Stir gently to ensure even distribution.
4. Optional: Add Essential Oils and Coloring:
– If you’d like to add essential oils for fragrance, do so at this stage. Start with a few drops and adjust according to your preference. If using natural coloring agents, add them now, a little at a time, until you achieve your desired hue.

5. Pour into Soap Molds:
– Carefully pour the melted soap mixture into your chosen soap molds. Fill them to the top.
6. Allow to Cool and Set:
– Let the soap cool and set for several hours or overnight. It’s best to leave it undisturbed during this time.
7. Remove from Molds:
– Once the soap has fully cooled and solidified, gently pop it out of the molds. If you encounter any resistance, give it a little time to continue setting.
8. Store and Use:
– Store your propolis soap in a cool, dry place. It’s now ready for use!
Remember, this is a basic recipe. Feel free to experiment with different essential oils, coloring agents, or even additional skin-nourishing ingredients like shea butter or aloe vera gel. Always test a small area of your skin to ensure you don’t have any adverse reactions to the soap.
Enjoy your handmade propolis soap, and share the natural benefits of bee propolis with others!

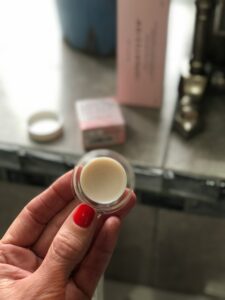
Propolis Lip Balm Recipe
Ingredients:
– 2 tablespoons beeswax
– 2 tablespoons shea butter
– 2 tablespoons coconut oil
– 1 teaspoon propolis tincture (or propolis-infused oil)
– Optional: a few drops of essential oil for flavor (e.g., peppermint, lavender)
Equipment:
– Double boiler or a heatproof bowl and saucepan
– Lip balm tubes or small containers
– Stirring utensil (preferably a disposable one)
– Pipette (for precise measuring and transferring)

Steps:
1. Prepare Your Work Area:
– Ensure your workspace is clean and well-ventilated. Lay out all your ingredients and equipment.
2. Melt the Beeswax, Shea Butter, and Coconut Oil:
– Fill the bottom of a double boiler (or a saucepan with water and a heatproof bowl on top) with water and set it over low to medium heat.
– Add the beeswax pellets, shea butter, and coconut oil to the top of the double boiler or the heatproof bowl. Allow them to melt slowly, stirring occasionally with a disposable utensil.
3. Incorporate the Propolis Tincture:
– Once the mixture is fully melted, remove it from heat. Allow it to cool slightly, but not enough to solidify.
– Add the propolis tincture and mix well. The propolis tincture provides the lip balm with its beneficial properties.

4. Optional: Add Essential Oil (for Flavor):
– If you want to add flavor to your lip balm, now is the time. Use a pipette to add a few drops of your chosen essential oil and stir thoroughly.
5. Pour the Mixture into Containers:
– Carefully pour the liquid lip balm mixture into your chosen containers. Use a steady hand or a small funnel to avoid spills.
6. Allow to Cool and Solidify:
– Leave the containers undisturbed until the lip balm has completely cooled and solidified. This typically takes about 20-30 minutes.
7. Label and Store:
– Once the lip balm is fully set, cap the containers and label them with the ingredients and any other relevant information. Store them in a cool, dry place.
Congratulations! You’ve now created your very own propolis-infused lip balm. Enjoy the soothing and protective benefits it offers to your lips.

Propolis Lotion or Cream
Ingredients:
1/2 cup of Beeswax
1/2 cup of Coconut Oil (or another carrier oil like Jojoba or Sweet Almond Oil)
2 tablespoons of Propolis Tincture
10-20 drops of Essential Oil for fragrance (optional)
Glass jars or containers for storage
Equipment:
Double boiler or a heatproof bowl and a saucepan
Whisk or spoon for stirring
Measuring cups and spoons
Glass dropper (for the essential oil, if using)

Steps:
1. Prepare Your Workspace:
– Ensure your workspace is clean and sanitized. Have all your ingredients and equipment ready.
2. Melt the Beeswax and Carrier Oil:
– Use a double boiler or a heatproof bowl placed over a saucepan of simmering water to melt the beeswax and carrier oil. Stir occasionally until completely melted.
3. Add the Propolis Tincture:
– Once the beeswax and carrier oil are melted, remove from heat and allow it to cool slightly. Add the propolis tincture and mix well.
4. Add Essential Oil (Optional):
– If you’re using essential oil for fragrance, add it to the mixture and stir well. Be cautious with the amount, as essential oils are potent.
5. Pour Into Containers:
– Carefully pour the mixture into clean, sanitized glass jars or containers. Leave them open until the lotion or cream cools and solidifies.

6. Allow to Cool and Set:
– Let the mixture sit undisturbed until it cools and solidifies, which may take a few hours.
7. Label and Store:
– Once cooled and set, label your containers with the date and ingredients. Store in a cool, dry place away from direct sunlight.
**Notes:**
– The consistency of your lotion or cream will depend on the ratio of beeswax to carrier oil. Adjust this to achieve your desired texture.
– Beeswax acts as a natural emulsifier, helping to bind the oil and water-based ingredients together.
– Ensure your containers are clean and airtight to prevent contamination.
– Test a small amount of the lotion on your skin to ensure there are no allergic reactions before using it more widely.
Remember, this is a basic recipe. Feel free to experiment with different carrier oils, essential oils, and propolis concentrations to tailor the lotion or cream to your preferences.

Propolis Throat Spray Recipe
Ingredients:
1 tablespoon of propolis tincture
1/4 cup of purified water
1 tablespoon of raw honey (optional, for taste)
1-2 drops of essential oil (e.g., peppermint, lemon, or tea tree) for flavor (optional)
A small, clean spray bottle
Instructions:
1. Prepare Your Work Area:
Ensure that your workspace and utensils are clean and sanitized to maintain the purity of your throat spray.
2. Combine Propolis Tincture and Water:
In a small glass or plastic bowl, mix 1 tablespoon of propolis tincture with 1/4 cup of purified water. This dilutes the tincture and ensures it’s safe for use.
3. Optional: Add Honey and Essential Oil:
If you’d like to sweeten the spray and add flavor, stir in 1 tablespoon of raw honey. Additionally, add 1-2 drops of your chosen essential oil for taste (optional).
4. Mix Thoroughly:
Stir the mixture well to ensure all ingredients are thoroughly combined.
5. Transfer to Spray Bottle:
Using a funnel or a steady hand, pour the mixture into a clean, small spray bottle. It’s recommended to use a dark glass bottle to protect the contents from light.
6. Label and Date:
Label the bottle with the contents (“Propolis Throat Spray”) and include the date of preparation.
7. Store and Use:
Keep your propolis throat spray in a cool, dark place. To use, shake the bottle well and spray directly into the back of the throat as needed.
**Notes**:
– Always consult with a healthcare professional before using any new herbal or natural remedy, especially if you have any pre-existing health conditions or allergies.
– Make sure to source high-quality, pure propolis tincture for the best results.
– If you experience any adverse reactions or discomfort after using the throat spray, discontinue use and seek medical advice.
By following these steps, you’ll have a homemade propolis throat spray that can provide natural support for throat health.

Propolis-Infused Honey
Ingredients:
– Raw honey
– Bee propolis (cleaned and ground into small pieces)
Equipment:
– Glass jar with a tight-fitting lid
– Fine-mesh strainer or cheesecloth
– Stirring utensil (wooden spoon or honey dipper)

Steps:
1. Prepare the Bee Propolis:
– Ensure that the bee propolis is clean and free from any debris. If needed, gently clean it using water and allow it to air dry.
2. Combine Propolis and Honey:
– Place the cleaned bee propolis pieces into a glass jar. Add raw honey to the jar, ensuring that the propolis is fully submerged.
3. Stir and Seal:
– Use a stirring utensil to gently mix the honey and propolis together. Make sure the lid of the jar is tightly sealed to prevent any contaminants from entering.
4. Infusion Period:
– Allow the mixture to infuse for about 1 to 2 weeks. Keep the jar in a warm, dark place to facilitate the infusion process. Stir the mixture every few days to ensure even distribution of the propolis.

5. Strain the Mixture:
– After the infusion period, strain the honey through a fine-mesh strainer or cheesecloth to remove the propolis pieces. This will leave you with a smooth, infused honey.
6. Store the Infused Honey:
– Transfer the strained honey into a clean, airtight jar for storage. Label it appropriately with the date and “Propolis-Infused Honey.”
**Tips:**
– Use a clean, dry spoon when scooping honey from the jar to prevent introducing moisture or contaminants.
– You can adjust the strength of the infusion by varying the amount of propolis used. For a milder flavor and potency, use less propolis; for a stronger infusion, use more.
– Store the infused honey in a cool, dark place to maintain its quality and flavor.
I hope you’ve enjoyed these simple recipes! Don’t forget to sign up for the free Giggles and Gloves Newsletter, then check out some easy homestead recipes by clicking here!

